
Common Roll Forming Problem
Roll Forming Troubleshooting
It is often difficult to pinpoint the exact cause of product quality problems because of the many potential contributing sources. When a new set of rolls is installed, it almost always requires some minor modification to correct the usually unforeseen problems caused by the roll design. ▷ Common Roll Forming Problem | Roll Forming Guide ◁.Common problems in the roll forming machine, The setup of the roll form tooling. here we will show the reader some Common Roll Forming Problems.

Summary Most of the factors that Couse problems in roll forming machine:
1-Entry Guide Stand:
Sometimes entry guide stands, in the Beginning, which can cause the twist or camber problem. When you are trying to adjust the straightener, but twisting it back and then trying to eliminate twist but nothing happens? in this case, firstly Check the entry table and make sure the material be perpendicular to the rolls.
Make sure the stand is in good working order (twist can be induced if the stand is allowed to move off one side to the other). If the sides are not aligned properly, use a 24” scale and place half of it on the front or flat face of the first pass. Align the guide parallel to the scale and tighten the stand. This is a quick and easy way to potentially minimize twists.
Roll Forming Guide
2- Excessive Pressure
Excessive Pressure there are on the Inboard or Outboard Side of the Tooling is a common mistake that operators make when they are adjusting the rolls. operators adjust the rollers without material in the machine at first which can lead to twisting, down bow, up the bow, etc.
In order to solve this, gauge the roll form tooling without the material and check the rolls using a mirror to view between each pass. and check rolls are matched properly. Then start the material through the first pass and re-gage the rolls. Set the roll gaps based on the actual material thickness you are running. Then forward the machine about one inch and check the gap, you may need to do this a few times to get the proper gap. Continue this process for the remaining passes.
3-unsuitable Roll Match
Matching the roll form rollers should be a procedure during setup. After you have the rolling set up and adjusted to the material thickness, you should make a habit of checking the match between top and bottom rolls. Take a mirror and a sheet of white paper and hold the paper at a slight angle between the rolls On the other side of the roll, look in the mirror and check the outline of the rolls where the material will be formed. You should have an equal gap around the form and just a small amount (0.005-0.010”) more between the top and bottom rolls.
Set up for roll forming success
4- Lack of Lubrication
maybe you don’t believe that the roll forming effect is dependent on lack of lubrication. These days, we are designing and manufacturing roll forming machines for very difficult profiles. These profiles can involve multiple material thicknesses and types. At the same time, we are asked to do all of this with one set of rollers. Depending on the rollers’ design, there may be issues with the material fighting drag with all compression and stretching as it is being formed. Sometimes just a little bit of lubricant works wonders. If the product cannot have lubricant on it, there are many types of vanishing oil that dissipate after the product has been formed.
some of the parameters that determine straightness include :
- Twist
- Bow/cross blow
- camber/Sweep/curve
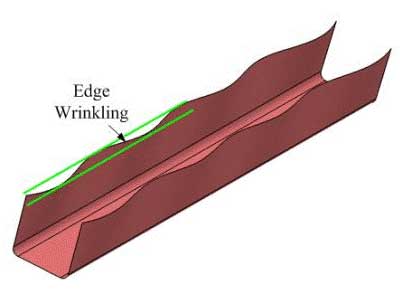
- Edge wave
- Flare
How to Adjust a Roll Former
1. Twist
twist in the roll-formed part is like a corkscrew effect and often caused by excessive forming pressure and asymmetrical profiles. generally, twists can be held to less than 5 degrees in 10 feet or 3 meters
the twist problems are usually attributable to setup mistakes. The twist is the rotation of two sides of the profile directions. there is so important notice” Twist in a formed part is generally the result of excessive forming pressures along the longitudinal radii”.
there is a list of some of the problems about a twist in roll forming machine and some remedies for the roll form operators:
Troubleshooting Roll Forming
Checklist table for twist problem:
Roller Set-Up | 1-Balance rollers gaps 2- Increase the roll gap in an area where twisting occurs. 3- Reduce the degree of forming in several stands, 4- allowing a smoother strain distribution |
| Profile drawing | 1-Normally Symmetrical panels run without twist issues 2-Nonsymmetrical panels are most susceptible to twist. |
| Material | 1-Changes in thickness across the width of material can cause twist, especially if the edges are thicker than the center. The edges will deformation more than the center and twisting can result. |
| Heat | 1- check the roll gaps for heat expansion (increase Heat of rollers from the forming process can reduce the roll gaps than originally set, resulting in a twist. If the panel runs okay at startup and subsequently twist appears) 2- use lubricants can reduce temperature increase during forming. 3- maintain the sharpest corners cool as possible (Sharp corners are a source of localized heat expansion, which can be minimized by lubrication) |
| Cut-off | make sure the cutting blade is in the right position and won’t make any distortion or reflection on the profile during passing the profile through the blade. |
| CLEAN ROLLERS | 1-Clean the rollers periodically to remove any pick up from them, Galvanized or coating pickup on the rollers can reduce the roller gap than first adjusted. 2-The use of a lubricant can reduce or eliminate roll pickup. |
2.Bow
The vertical plane deviation from a straight line can be a cross or longitudinal bow, it is caused by uneven vertical gaps on symmetrical cross-sections and uneven forming areas on asymmetrical sections in the general bow can be held to plus or minus 1/8 inch in 10 feet or 3mm in 3 meters.
The bow is the variation from a straight line in the vertical plane. It can be either crossbow or longitudinal bow. The bow is often caused by the existence of irregular vertical spaces on symmetrical sections and from uneven forming areas on unsymmetrical sections.


Checklist table for bow problem:
| Rollers | Rollers that are not adjusted properly cause bow. |
Pass Line Height | The bow can also result from uneven pass line height. Check the pass line height and adjust. |
| Material | incoming material issues such as gauge variation or shape can cause the bow |
| Straightener | Moving up or down |
Common Problems with a Roll Forming machine
3. camber
Camber is the deviation of a side edge from a straight line measured prior to roll forming. The maximum allowable camber 3/8 of an inch in 10 feet or 9.5 mm in 3 meters. Excessive camber induces curved bow and twists in the finished roll from parts
Sweep or camber is the deviation from a straight line in the horizontal plane of a finished panel along the length.
Checklist table for camber problem:
| Material | Sweep, or camber can be the result of incoming material issues. Variable width or thickness |
| rollers | Camber problems can also be the result of the excessive roll gap tightness. |
| Alignment | Shoulder alignment, spaces and roll design should all be carefully scrutinized to minimize sweep issues. |
4. Edge wave
Edge waves easily happen in the roll-forming process of thin steel parts, which greatly influences the forming quality. Waves can occur because the distance from the edge to the first bend is too great, or the metal is too thin.
Checklist table for edge wave problem:
| Leg Length | A bend near the edge can reduce an edge wave problem. bends at the edges should be at least 3-6 times the material thickness in distance from the edge |
| Horizontal | raising the top rolls a little can often reduce or eliminate edge wave |
| Lubrication | The addition of a lubricant can often reduce or eliminate edge wave. |
Material Shape | Some shapes are susceptible to this problem |
Troubleshooting Causes of Twist at Roll Forming
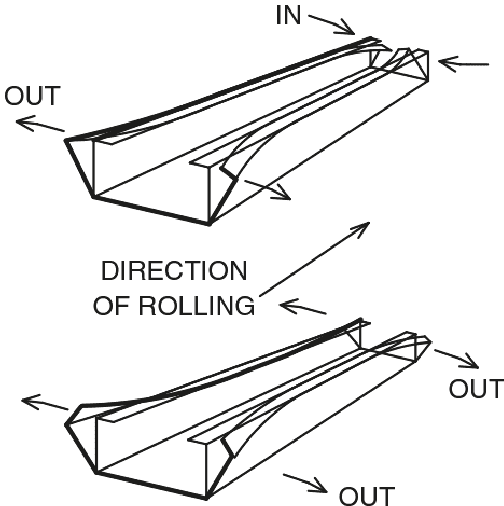
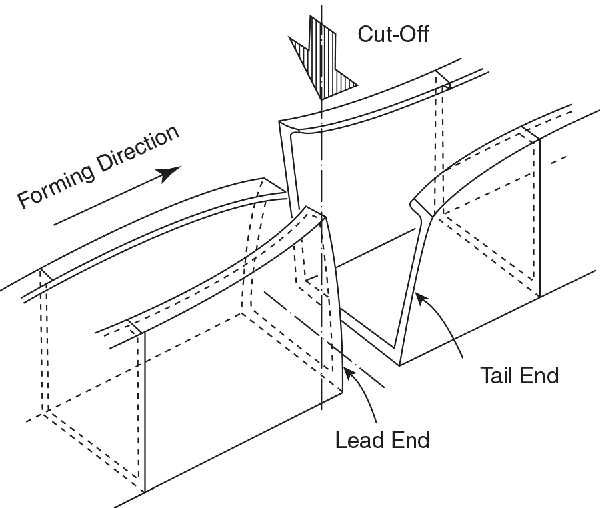
5. Flare :
End flare is the change in the cross-sectional profile at the ends (front and rear) of a roll-formed part compared to any other sections along its length.
The end flare of a roll-formed product can be toward or away from the centerline of the section, where the flanges move at the open ends of the part. If lower strength materials are used in roll forming of shallow sections with pre-cut strips, then usually the front end is “flared-in” and the tail end is “flared-out”.
If the number of passes is too few, that is, too much forming is being
done per stand for a given part configuration, flare can result.
Checklist table for flare problem:
Number of Passes | Extra roll passes can minimize end flare |
Pre-punched Holes | Avoid pre-punched edges at the cutoff zone |
| Material | More ductile materials can reduce flare. |
| Rollers | Be sure that the roll former is adjusted correctly |
| Side Rolls | sometimes Flare can be fixed by “pushing” the sides inward at the exit end of the line with side rolls. |
Part Straightener | Occasionally, the only recourse is to add a part straightener at the end of the roll-forming line |